How to fix a baggy crotch in pants?
Are you tired of constantly hitching up your pants or feeling like you’re swimming in excess fabric around the crotch area? We’ve all been there, struggling with pants that seem to have a mind of their own when it comes to fit. But fear not, because, in this guide, “How to fix a baggy crotch in pants?” We’ll unveil simple and practical solutions to resolve the baggy crotch dilemma in your favorite trousers. Say goodbye to uncomfortable sagging and hello to a snug and stylish fit that’ll have you strutting your stuff with confidence. Let’s dive into the world of pants alterations and learn how to fix that baggy crotch issue once and for all!
Related pots: How to change the needle on the sewing machine?
Exploring the Baggy Crotch Standing

The baggy crotch situation arises when an undue amount of fabric gathers in the pants’ crotch area, resulting in a drooping or sagging appearance. Several things can cause this:
- Size Mismatch: Wearing pants that are too large is a primary reason behind this issue. Excess fabric can accumulate in the crotch area, creating a baggy look.
- Design or Manufacturing Defects: Sometimes, the issue is not with the size but with the design or construction of the pants. A poorly tailored crotch area can result in a saggy fit, irrespective of the pants’ overall size.
- Body Changes: Recent weight loss might make your previously well-fitted pants seem larger, leading to a baggy crotch. In these cases, the rest of the pants may still fit well, but the crotch area might be too loose.
Tools Needed to Fix a Baggy Crotch
| Tool | Purpose |
| Sewing machine | It is used to make the necessary adjustments to the pants, such as taking in the crotch area. |
| Seam ripper | This tool is used to undo the seams in the crotch area of the pants before adjustments are made. |
| Pins | Pins are used to hold the fabric in place when making adjustments before sewing. |
| Fabric marker | A fabric marker is used to mark the areas where adjustments are needed. |
| Tape measure | A tape measure is essential for taking accurate measurements of your body and the pants to ensure a proper fit after the adjustments. |
| Iron and iron board | These are used to press the seam flat after sewing. |
Fixing a Baggy Crotch in Pants: An Easy-to-follow Guide
Navigating the realm of ill-fitting pants can be frustrating, especially when dealing with the common problem of a ‘baggy crotch’. This term refers to an excess of fabric in the crotch area that results in an unflattering and uncomfortable fit. Thankfully, there’s a solution to this problem, and with a bit of patience and precision, you can fix it right at home. Let’s delve into the process.
Step 1: Put on the pants

Begin by wearing pants. Stand in front of a full-length mirror and carefully examine the crotch area to determine the amount of bagginess. This will give you a visual understanding of the alterations needed.
Step 2: Pin the Excess Fabric

Stand in front of a mirror and cautiously pinch the extra fabric along the crotch seam until it sits comfortably. Be careful to pinch just enough to eliminate the baggy appearance without sacrificing comfort. Use straight pins to secure this extra fabric once you achieve the desired fit.
Step 3: Mark the Changes

With a fabric marker, sketch a line along the pinned area. This line will act as a guide for sewing, indicating the location of the new seam.
Step 4: Prep for Sewing

Now remove the pants carefully, ensuring the markings are not disturbed. Remove the pins used to secure the fabric.
Also read: How to tighten jeans without a belt?
Step 5: Remove the Existing Seam

Here, you need your seam ripper. Gently undo the existing seam in the crotch area, starting from the top and proceeding until the end of the marked area.
Step 6: Sew the New Seam

Thread your sewing machine and sew along the marked line. Start at the top and move downward, following the line meticulously. Ensure you create a durable seam by backstitching at the seam’s beginning and end.
Step 7: Verify the Adjustments
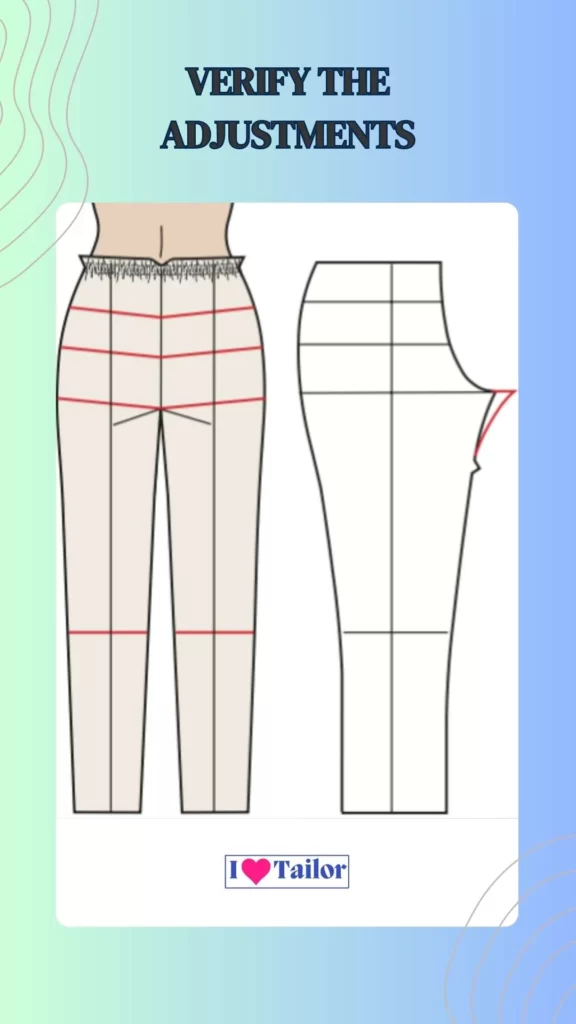
Once you’ve seen the new seam, trim the surplus fabric, leaving about a half-inch seam allowance. Try the pants on again. Check in the mirror to see if the crotch sits well and if the bagginess has been eliminated. If not, you might need to repeat steps 2–6 until you’re content with the fit.
Step 8: Complete the Seam

Take off the pants and use an iron to press the new seam flat. This will lend a neat and professional finish to your pants.
FAQs
What if the pants are still baggy after adjustment?
Retry the steps or consider professional tailoring assistance.
Can I fix a baggy crotch without a sewing machine?
Yes, it’s feasible with hand sewing, though it takes more time and may not be as sturdy.
Will this alteration affect the overall fit of the pants?
Typically, no, but if it does, other parts of the pants might also need adjustment.
Can I apply these steps to any type of pants?
Yes, though materials like leather or heavy denim may require specific handling or tools.
Conclusion: How to fix a baggy crotch in pants?
A baggy crotch in pants can be both unsightly and uncomfortable. However, as outlined in this guide, it is not a problem without a solution. With the right tools, some patience, and careful sewing, you can resolve the baggy crotch issue and make your pants fit perfectly. Always take accurate measurements and avoid rushing the process. Should you require expert assistance, professional tailors are available. The goal is to ensure you feel confident and comfortable in your attire.
Thanks!